
Nightwatch JS provides inbuilt API methods to simulate Keyboard and Mouse events. In the article, we will discuss in detail how we can simulate keypresses and mouse hover on a web app. To further deep-dive let’s automate a simple scenario.
For Keyboard Events:
We have a webpage (https://the-internet.herokuapp.com/key_presses) which registers Key presses and displays them like this:
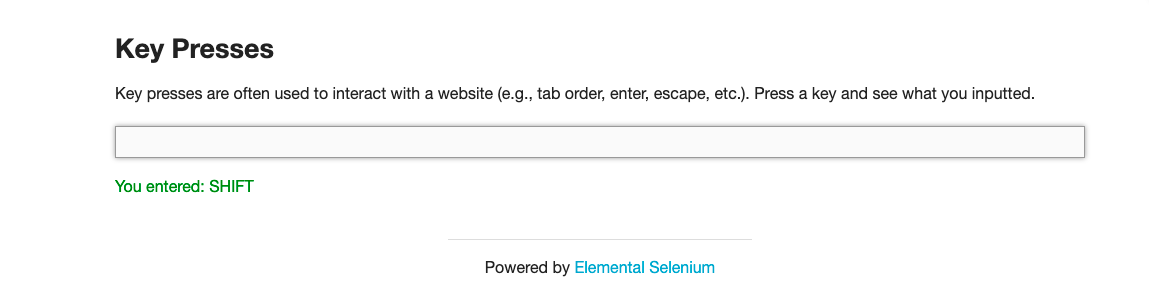
So for our test, we would first be entering the alphabet ‘J’ followed by ‘BackSpace’ and validate both on the webpage. Let’s write a test for this –
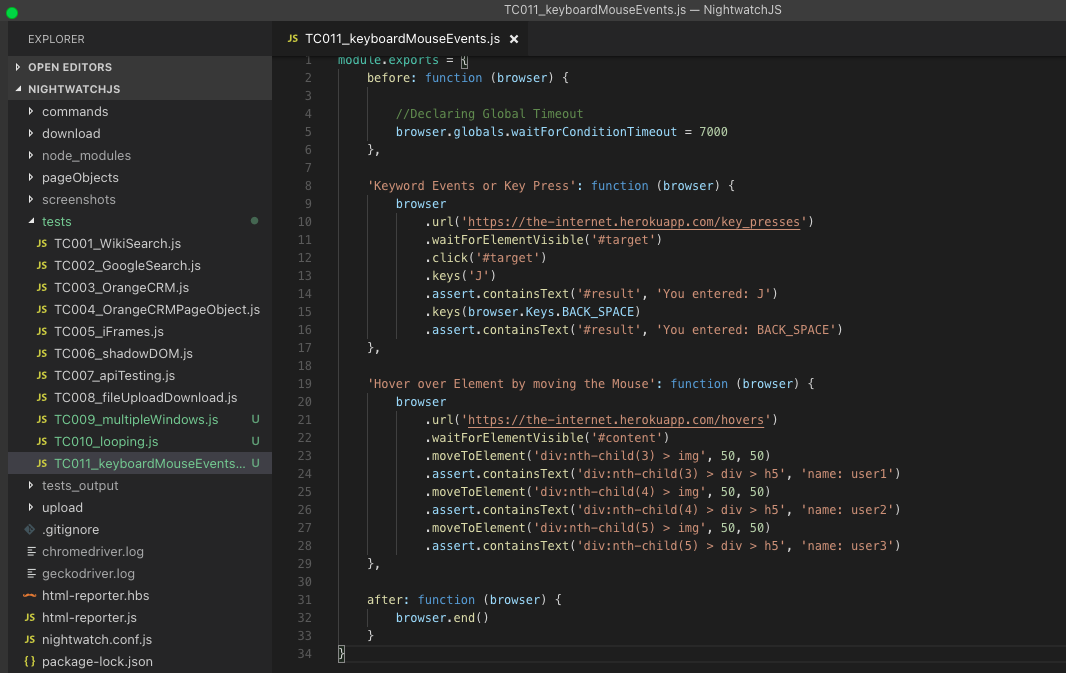
1 2 3 4 5 6 7 8 9 10 | 'Keyword Events or Key Press': function (browser) { browser .url('https://the-internet.herokuapp.com/key_presses') .waitForElementVisible('#target') .click('#target') .keys('J') .assert.containsText('#result', 'You entered: J') .keys(browser.Keys.BACK_SPACE) .assert.containsText('#result', 'You entered: BACK_SPACE') } |
.url(‘https://the-internet.herokuapp.com/key_presses’) – Opens the URL in the browser.
.waitForElementVisible(‘#target’) – Wait for the input box to be visible on the web page.
.click(‘#target’) – Clicks inside the input box.
keys(‘J’) – .keys() is an API method to send key strokes to current element. Here we are sending the alphabet ‘J’.
.assert.containsText(‘#result’, ‘You entered: J’) – Asserting the text ‘You entered: J’ on the web page.
.keys(browser.Keys.BACK_SPACE) – Here we are entering the Backspace key stroke.
.assert.containsText(‘#result’, ‘You entered: BACK_SPACE’) – Asserting the text ‘You entered: BACK_SPACE’ on the web page.
For Mouse Events:
We have a webpage(https://the-internet.herokuapp.com/hovers) with three cards and hovering over each card will display different texts like this:
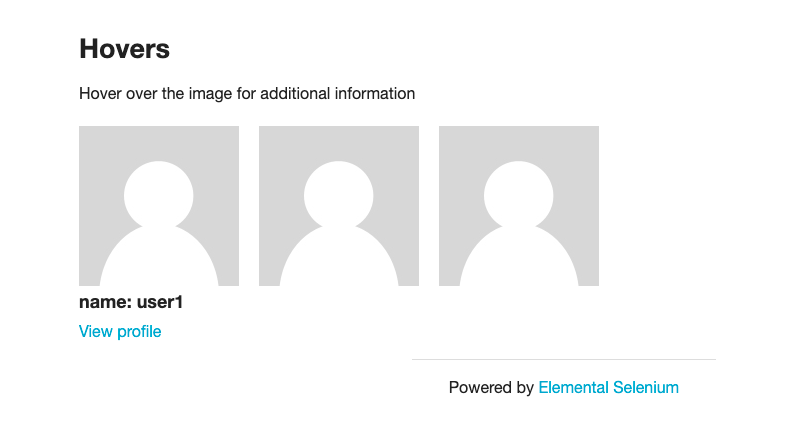
So for our test, we would be hovering over the three cards one by one and then validating the texts that are displayed beneath each of them.
1 2 3 4 5 6 7 8 9 10 11 | 'Hover over Element by moving the Mouse': function (browser) { browser .url('https://the-internet.herokuapp.com/hovers') .waitForElementVisible('#content') .moveToElement('div:nth-child(3) > img', 50, 50) .assert.containsText('div:nth-child(3) > div > h5', 'name: user1') .moveToElement('div:nth-child(4) > img', 50, 50) .assert.containsText('div:nth-child(4) > div > h5', 'name: user2') .moveToElement('div:nth-child(5) > img', 50, 50) .assert.containsText('div:nth-child(5) > div > h5', 'name: user3') } |
.url(‘https://the-internet.herokuapp.com/hovers’) – Opens the URL in the browser.
.waitForElementVisible(‘#content’) – Wait for the three cards to be visible on the web page.
1 2 | .moveToElement('div:nth-child(3) > img', 50, 50) .assert.containsText('div:nth-child(3) > div > h5', 'name: user1') |
.moveToElement() moves the mouse by an offset of the specified element. If an element is provided but no offset, the mouse will be moved to the center of the element. If the element is not visible, it will be scrolled into view. It accepts five parameters – using(The locator strategy to use optional), selector, xoffset(X offset to move to, relative to the top-left corner of the element), yoffset(Y offset to move to, relative to the top-left corner of the element), callback(callback function to be called when the command finishes optional). So here .moveToElement(‘div:nth-child(3) > img’, 50, 50) we are passing the selector, xoffset as 50 and yoffset as 50. And when the mouse is over the element, then we are asserting the text name: user1.
1 2 | .moveToElement('div:nth-child(4) > img', 50, 50) .assert.containsText('div:nth-child(4) > div > h5', 'name: user2') |
This similarly checks the hover text for card 2.
1 2 | .moveToElement('div:nth-child(5) > img', 50, 50) .assert.containsText('div:nth-child(5) > div > h5', 'name: user3') |
This checks the hover text for card 3.
Let’s combine both the tests in a single JS file and run it:
1 2 3 4 5 6 7 8 9 10 11 12 13 14 15 16 17 18 19 20 21 22 23 24 25 26 27 28 29 30 31 32 33 34 | module.exports = { before: function (browser) { //Declaring Global Timeout browser.globals.waitForConditionTimeout = 7000 }, 'Keyword Events or Key Press': function (browser) { browser .url('https://the-internet.herokuapp.com/key_presses') .waitForElementVisible('#target') .click('#target') .keys('J') .assert.containsText('#result', 'You entered: J') .keys(browser.Keys.BACK_SPACE) .assert.containsText('#result', 'You entered: BACK_SPACE') }, 'Hover over Element by moving the Mouse': function (browser) { browser .url('https://the-internet.herokuapp.com/hovers') .waitForElementVisible('#content') .moveToElement('div:nth-child(3) > img', 50, 50) .assert.containsText('div:nth-child(3) > div > h5', 'name: user1') .moveToElement('div:nth-child(4) > img', 50, 50) .assert.containsText('div:nth-child(4) > div > h5', 'name: user2') .moveToElement('div:nth-child(5) > img', 50, 50) .assert.containsText('div:nth-child(5) > div > h5', 'name: user3') }, after: function (browser) { browser.end() } } |
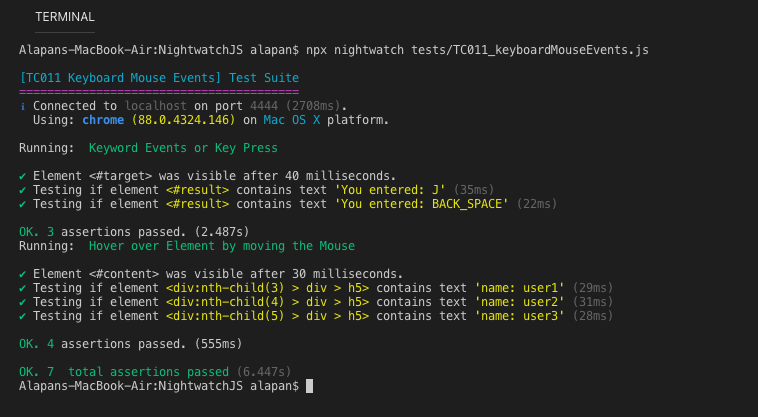
After Execution:
Do check out 🙂
Github: https://github.com/alapanme/NightwatchJS
All Nightwatch JS Articles: https://testersdock.com/nightwatch-js-tutorial/


