Cucumber is a tool that supports Behaviour-Driven Development (BDD). Cucumber reads executable specifications written in plain text and validates that the software does what those specifications say. The specifications consist of multiple examples or scenarios. In order for Cucumber to understand the scenarios, they must follow some basic syntax rules, called Gherkin. Gherkin is a set of grammar rules that makes plain text structured enough for Cucumber to understand.
Let’s add cucumber to cypress and automate a simple login scenario using data tables.
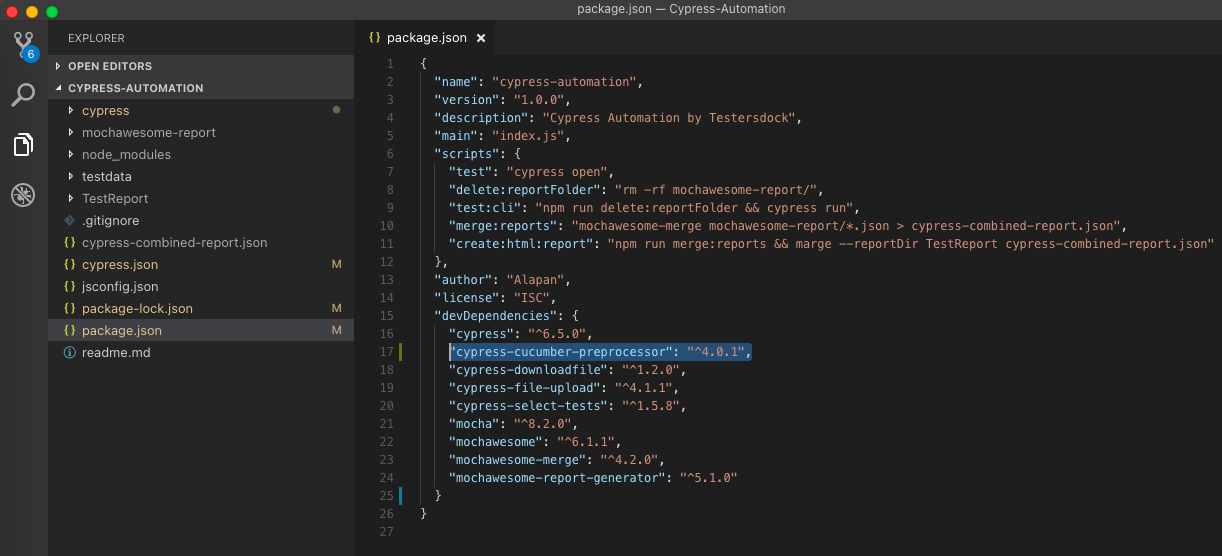
Step 1: Install the cypress-cucumber-preprocessor plugin.
1 | npm install --save-dev cypress-cucumber-preprocessor |
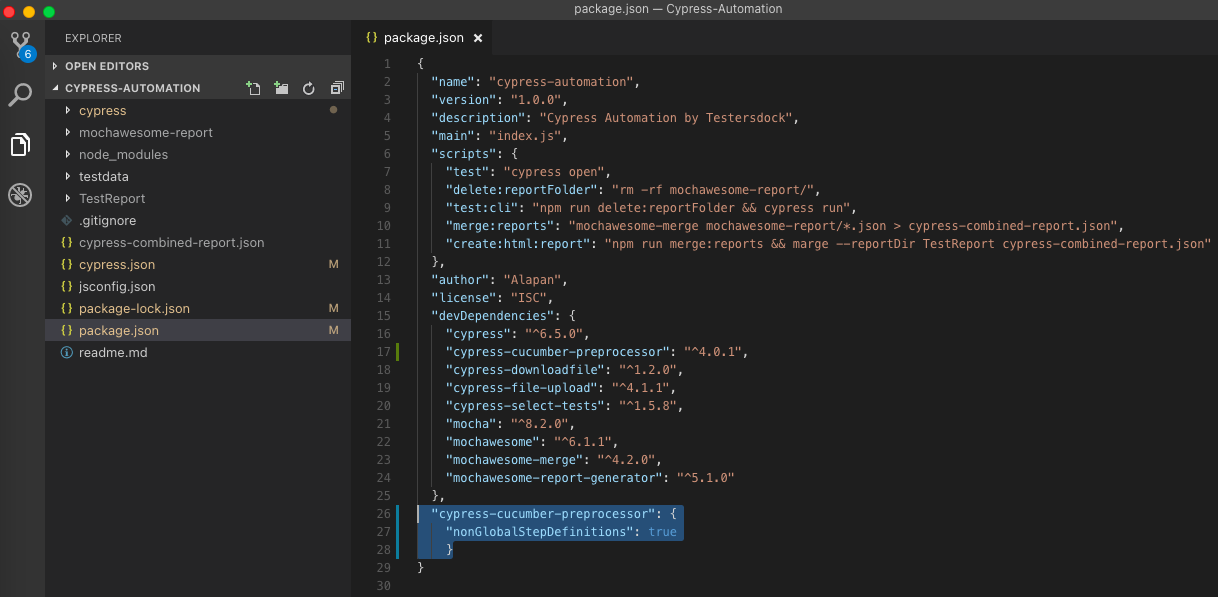
Step 2: In your package.json write below. This is to make sure that cypress-cucumber-preprocessor doesn’t use global step definitions.
1 2 3 | "cypress-cucumber-preprocessor": { "nonGlobalStepDefinitions": true } |
Step 3: Go to cypress/plugins/index.js and write:
1 2 3 4 5 | const cucumber = require('cypress-cucumber-preprocessor').default module.exports = (on, config) => { on('file:preprocessor', cucumber()) } |

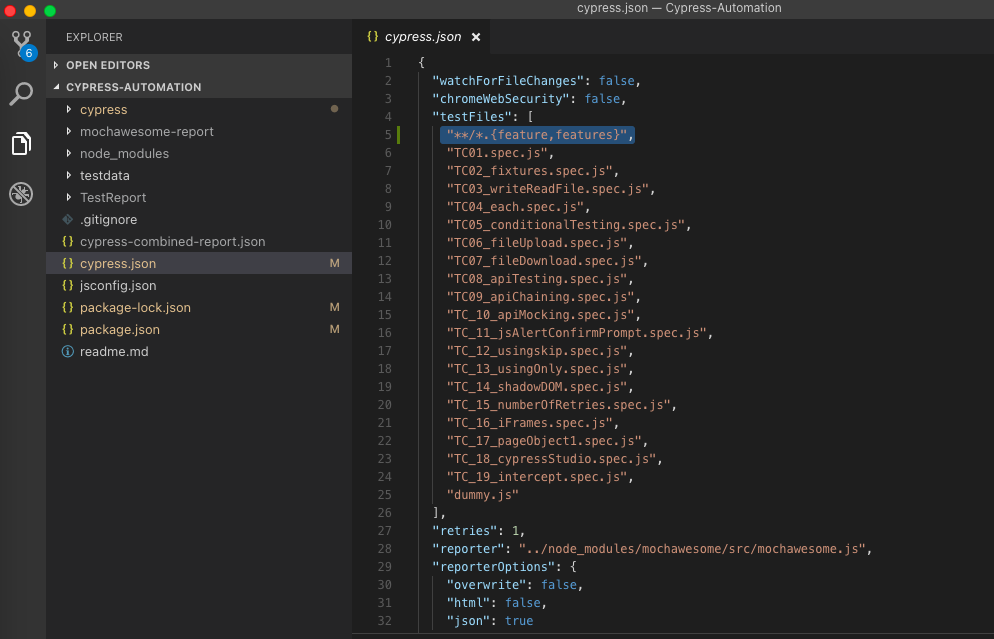
Step 4: Go to cypress.json and add below. This is to add support for feature files to our Cypress configuration.
1 2 3 | { "testFiles": "**/*.{feature,features}" } |
Step 5: Next, we will write our Cucumber test in Gherkin format (Given When Then). For that create a folder called cucumber-test inside cypress/integration folder and then create a file named login.feature and then write the below:
1 2 3 4 5 6 7 8 9 10 11 | Feature: Login Scenario Outline: Login to Orange CRM Website Given User is at the login page When User enters username as '<username>' and password as '<password>' And User clicks on login button Then User is able to successfully login to the Website Examples: | username | password | | Admin | admin123 | |
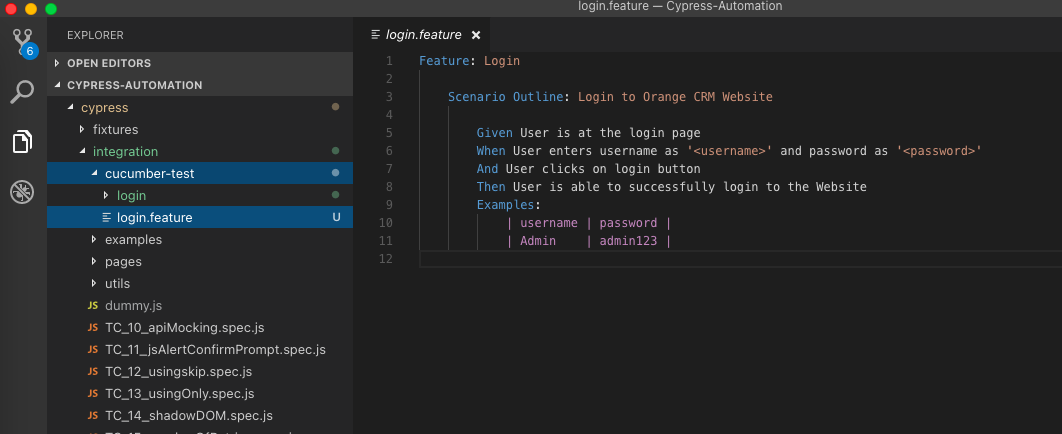
The Scenario Outline keyword can be used to run the same Scenario multiple times, with different combinations of values. Even though we have single pair of values for username and password, but since we are using a data table we are using scenario outline here.
Given steps are used to describe the initial context of the system – the scene of the scenario.
When steps are used to describe an event or an action.
And is used to replace successive Given’s, When’s, or Then’s,
Then steps are used to describe an expected outcome, or result.
A Scenario Outline must contain an Examples section. This tells the cucumber to run the scenario once for each row in the Examples section beneath it.
Step 6: Next step is to create a step definition file, which will translate each step of the feature file into actions that cypress will perform. For that inside cucumber-tests, create a folder named same as the feature file which in our case is login and inside the folder again create a js file – login.js and write:
1 2 3 4 5 6 7 8 9 10 11 12 13 14 15 16 17 18 | import { Given, When, Then } from 'cypress-cucumber-preprocessor/steps' Given('User is at the login page', () => { cy.visit('https://opensource-demo.orangehrmlive.com/') }) When('User enters username as {string} and password as {string}', (username, password) => { cy.get('#txtUsername').type(username) cy.get('#txtPassword').type(password) }) And('User clicks on login button', () => { cy.get('#btnLogin').click() }) Then('User is able to successfully login to the Website', () => { cy.get('#welcome').should('be.visible', {timeout: 10000}) }) |
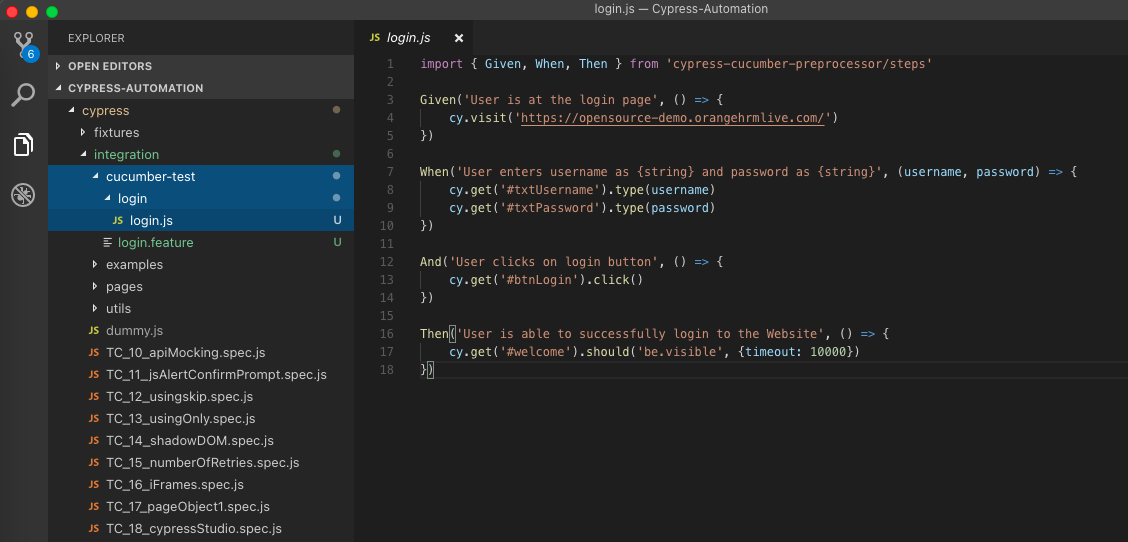
1 2 3 | Given('User is at the login page', () => { cy.visit('https://opensource-demo.orangehrmlive.com/') }) |
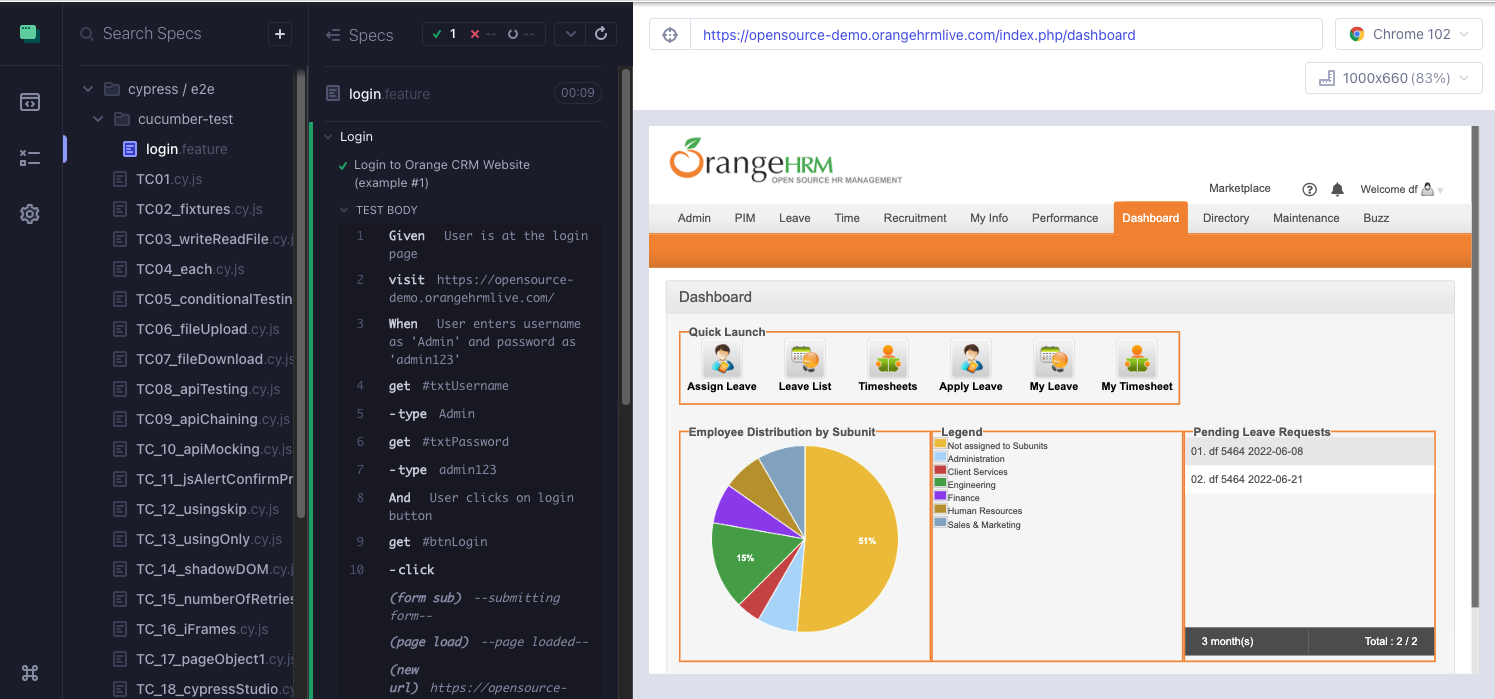
This opens the Orange CRM demo login website.
1 2 3 4 | When('User enters username as {string} and password as {string}', (username, password) => { cy.get('#txtUsername').type(username) cy.get('#txtPassword').type(password) }) |
This takes the value of username and password from the data table and inputs it in the username and password text boxes.
1 2 3 | And('User clicks on login button', () => { cy.get('#btnLogin').click() }) |
This clicks on the login button.
1 2 3 | Then('User is able to successfully login to the Website', () => { cy.get('#welcome').should('be.visible', {timeout: 10000}) }) |
This makes sure that after login, the webpage contains the Welcome text. Cypress will wait up to 10 seconds for the text to be visible on the webpage before marking it as failed.
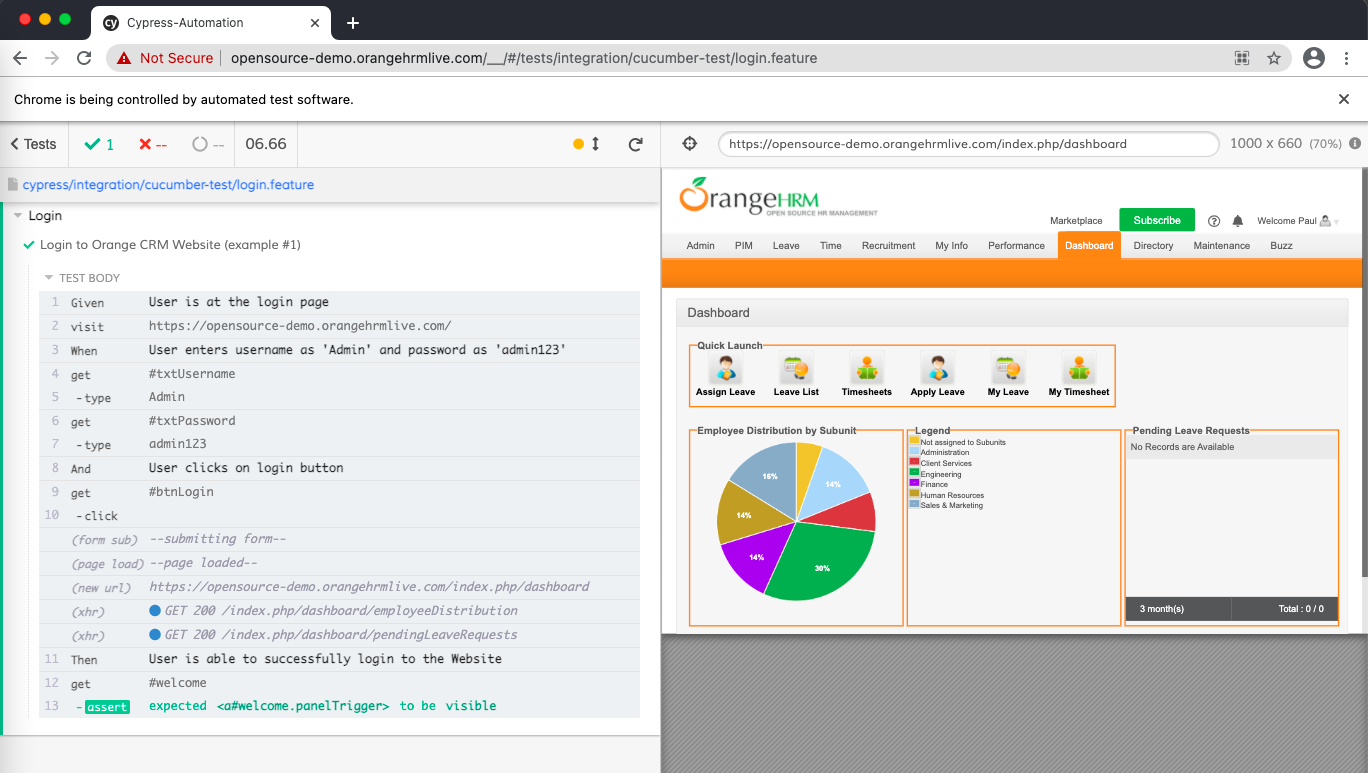
Step 7: Executing the tests via Test Runner:
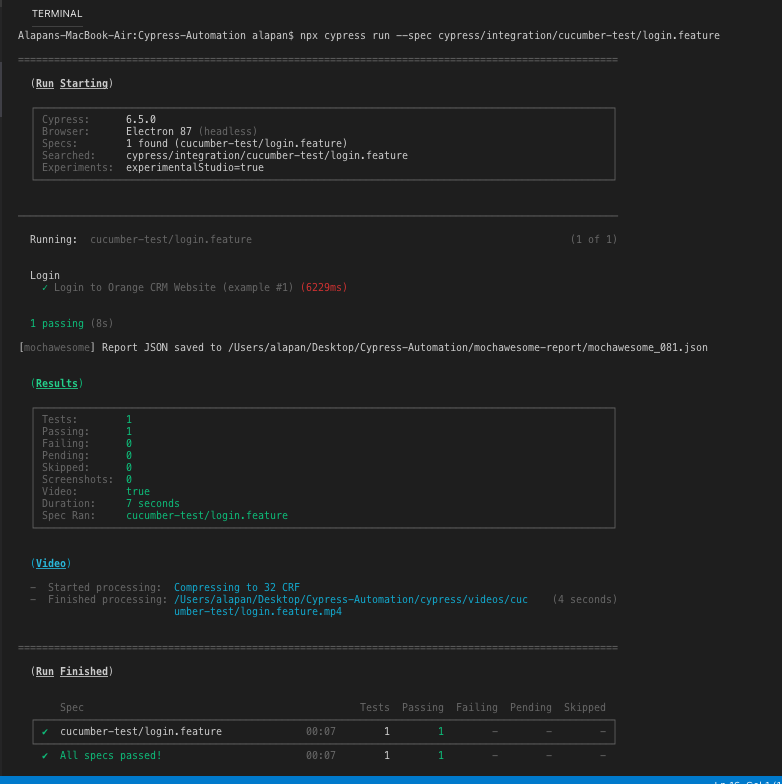
Step 8: Executing the tests via CLI using the command:
1 2 3 | npx cypress run --spec cypress/integration/cucumber-test/login.feature //For single feature file OR npx cypress run --spec cypress/integration/cucumber-test/*.feature //For all feature files |
Updated 26 Jun 2022 – If you are running Cypress 10, please follow the below steps:
1. Uninstall ‘cypress-cucumber-preprocessor’ plugin by using the command npm uninstall cypress-cucumber-preprocessor. This is because the repository has moved from github.com/TheBrainFamily to github.com/badeball. So now the cypress-cucumber repository is managed/developed by a different author. The new author has made new architectural changes to the plugin, so the best way to implement the plugin in the existing project is to do it from scratch.
2. Next, install the @badeball/cypress-cucumber-preprocessor using the command npm install -D @badeball/cypress-cucumber-preprocessor.
3. Next, install two more dependencies ‘@bahmutov/cypress-esbuild-preprocessor’ and ‘@esbuild-plugins/node-modules-polyfill’ using the commands npm install -D @bahmutov/cypress-esbuild-preprocessor and npm install -D @esbuild-plugins/node-modules-polyfill.
4. Next, go to cypress/plugin/index.js and remove the following code which was previously used for the old cypress-cucumber-preprocessor plugin.
1 2 3 4 5 6 | //For cucumber integration const cucumber = require('cypress-cucumber-preprocessor').default module.exports = (on, config) => { on('file:preprocessor', cucumber()) //For cypress cucumber preprocessor } |
and, add the following:
1 2 3 4 5 6 7 8 9 10 11 12 13 14 15 16 17 18 19 | //For Cucumber Integration const createEsbuildPlugin = require('@badeball/cypress-cucumber-preprocessor/esbuild').createEsbuildPlugin const createBundler = require('@bahmutov/cypress-esbuild-preprocessor') const nodePolyfills = require('@esbuild-plugins/node-modules-polyfill').NodeModulesPolyfillPlugin const addCucumberPreprocessorPlugin = require('@badeball/cypress-cucumber-preprocessor').addCucumberPreprocessorPlugin module.exports = async (on, config) => { await addCucumberPreprocessorPlugin(on, config) // to allow json to be produced // To use esBuild for the bundler when preprocessing on( 'file:preprocessor', createBundler({ plugins: [nodePolyfills(), createEsbuildPlugin(config)], }) ) return config } |
5. Next, in the package.json remove:
1 2 3 | "cypress-cucumber-preprocessor": { "nonGlobalStepDefinitions": true } |
and, add the following:
1 2 3 | "cypress-cucumber-preprocessor": { "stepDefinitions": "cypress/e2e/cucumber-test/**/*.{js,ts}" } |
This is done because most of the configuration options have been removed as a result of architectural changes and now there’s no distinction between “global” and “non-global” steps anymore. Steps are searched for using patterns and you can choose to include global steps or not.
6. In your cypress.config.js file, update the specPattern to include feature files:
1 2 3 | e2e: { specPattern: ["**/*.feature", "cypress/e2e/**/*.cy.{js,jsx,ts,tsx}"] } |
7. Next, in the step definition file replace import { Given, When, Then } from ‘cypress-cucumber-preprocessor/steps’ with import { Given, When, Then, And } from “@badeball/cypress-cucumber-preprocessor” .
8. Once all the above steps are done, we can see that the cucumber tests are running successfully.
9. In case after following all the steps you are still getting errors, then update the Node JS to the current(Latest Features) version. At the time of writing this article, the current version is 18.4.0.
Do check out 🙂
Github: https://github.com/alapanme/Cypress-Automation
All Cypress Articles: https://testersdock.com/cypress-tutorial/


Great Presentation. Appreciate more posts.
Hi,
I’ve attempted to follow this tutorial, having only used Cypress 10.0.
In the section following the update, section 4 mentions updating the ‘cypress/plugin/index.js’ file; however, this folder/file doesn’t exist since version 10.0, can you advise how this should be handled, presumably in the ‘cypress.config.js’ file, which I understand is now used for configuration.
I’ve also added the spec pattern from step 6; however, Cypress says that ‘no specs found’ when it opens. Have you any thoughts as to why this may be happening? When removing this spec pattern and renaming the ‘login.js’ to ‘login.cy.js’ the spec file can be found, although the test the fails when it runs.
Any help would be appreciated.
have similar issues. looks like this is not for cypress 10 at all. also cypress-cucumber-preprocessor is moved to a different repo now under @badeball/cypress-cucumber-preprocessor and they stopped supporting tags.
correction on my previous comment: after seeing and applying the update on the original post, things started working except tags. since @badeball/cypress-cucumber-preprocessor does not support tags anymore, I could not get tags working as before. Any suggestion to this issue ?
Where you able to resolve this, trying to install cypress and cucumber pre processor for the first time and also finding the same issue
I have the same issue. Index.js is not present in Cypress 10.0. I followed the exact steps and I get no files found
Hi Alapan,
While executing .feature file getting below error
Error: Webpack Compilation Error
./cypress/e2e/cucumber-test/speed.feature 1:13
Module parse failed: Unexpected token (1:13)
You may need an appropriate loader to handle this file type, currently no loaders are configured to process this file. See https://webpack.js.org/concepts#loaders
I ran this command also, but no use
npm install –save-dev @cypress/webpack-preprocessor
Please help me out
Hi,
Did you resolve your issue? I am struck with the same issue. Please help.
I’ve followed the steps and face below error. Kindly help.
CypressError: Timed out after waiting `60000ms` for your remote page to load.
Your page did not fire its `load` event within `60000ms`.
You can try increasing the `pageLoadTimeout` value in `home/circleci/repo/cypress.config.ts` to wait longer.
Browsers will not fire the `load` event until all stylesheets and scripts are done downloading.
When this `load` event occurs, Cypress will continue running commands.
Hi,
Thanks for this information, very helpful.
However, after doing all this, I have got compilation error, not sure why. Could anyone help?
Here is the error:
Error: Webpack Compilation Error
./cypress/e2e/cucumber test/SearchProperties.feature 1:19
Module parse failed: Unexpected token (1:19)
You may need an appropriate loader to handle this file type, currently no loaders are configured to process this file. See https://webpack.js.org/concepts#loaders
Here is my file:
///
const { defineConfig } = require(“cypress”);
const createEsbuildPlugin =
require(‘@badeball/cypress-cucumber-preprocessor/esbuild’).createEsbuildPlugin
const createBundler = require(‘@bahmutov/cypress-esbuild-preprocessor’)
const nodePolyfills =
require(‘@esbuild-plugins/node-modules-polyfill’).NodeModulesPolyfillPlugin
const addCucumberPreprocessorPlugin =
require(‘@badeball/cypress-cucumber-preprocessor’).addCucumberPreprocessorPlugin
module.exports = async (on, config) => {
await addCucumberPreprocessorPlugin(on, config) // to allow json to be produced
// To use esBuild for the bundler when preprocessing
on(
‘file:preprocessor’,
createBundler({
plugins: [nodePolyfills(), createEsbuildPlugin(config)],
})
)
return config
}
module.exports = defineConfig({
e2e: {
setupNodeEvents(on, config) {
// implement node event listeners here
},
specPattern: [“**/*.feature”, “cypress/e2e/**/*.cy.{js,jsx,ts,tsx}”],
chromeWebSecurity:false,
},
});